
"How to Quiet a Noisy PSU Fan: A Step-by-Step Guide to Swapping Your loud or defective PC Power Supply Fan"
- Nick
- May 10, 2024
- 7 min read
Updated: May 12, 2024
Does your Power Supply fan give a noisy rattle or is defective? Do you want to improve the cooling of the power supply while enjoying silent operation during gaming? Then I have here the guide to replace your standard PSU fan with a high-quality alternative, such as a Noctua NF-A9x14.

+++Before we start, an important safety note.+++
Even if the power supply is not connected to the wallsocket, capacitors in the power supply can still hold high voltages of up to 230V (120V in the USA/Canada). An electric shock of this strength can be fatal for humans and pets!
In the power supply, touch nothing but the fan cable to pull it out and later plug it back in. Do not leave the power supply lying around in an open state if other people or pets who are not aware of this danger could be nearby.
If you do not have the confidence to do this work, take the power supply unit to a PC repair shop or have another qualified specialist replace the defective fan.
Step 1 - Check the fan diameter you need
There are different form factors for computer power supplies, most of which require different fans. The rule of thumb is, the larger the power supply, the larger the fan used in it. Sounds simple, right? In reality, it’s a bit more complicated. Let’s take a look at a few examples and the fans used in them.
PSU Model | Formfactor | Fan Diameter | Fan Height |
bequiet! Dark Power 13 | ATX | 135mm | 25mm |
Bequiet Pure Power 12 | ATX | 120mm | 25mm |
Asus ROG Loki SFX-L | SFX-L | 120mm | 25mm |
FSP Dagger Pro | SFX | 92mm | 15mm |
Silverstone FX600 Platinum | Flex-ATX | 40mm | 20mm |
These are just examples to give you a guideline. You won’t find an SFX power supply with a 135mm fan, and neither an ATX power supply with a 40mm fan. Existing, but not very common, are also 80mm fan diameters in some SFX units.
Step 2 - Get the right fan for your power supply
Of course, you shouldn’t just use any fan for the replacement. Not that the new model makes even more noise than the old fan. Therefore, I have listed here a list of all recommended fans in the common categories:
120mm
92mm
40mm
After reading this list, it is noticeable that Noctua fans are frequently represented here. Not without reason these fans are considered an absolute premium option and are also without alternative in the 40mm area.
In the competition of the 92mm fans, the very cheap Thermalright TL-9015B can deliver similarly solid values as the Noctua, but is always narrowly beaten by the latter.
With the 120mm fans, there is already more choice. Here I could have listed other manufacturers with whom I have had good experiences, but for the sake of clarity, I have left it at the two premium options and two price-performance crackers. A little caution is advised with the Thermalright. Older batches of this fan are notorious for their clicking at low speeds. My two copies purchased in March 2024 no longer have this problem.
In any case, make sure that the replacement fan has similar airflow values to the old one. The Power Logic PLA09215B12H in my FSP Dagger Pro 550W psu offers a maximum airflow of 30 CFM (cubic feet per minute) at 2500 rpm. The Noctua NF-A9x14, I opted for also offers an airflow of 30 CFM (50.5 m³/h), but at 2200 rpm.
Have you found and ordered the right fan for you? OK, let’s continue!
Step 3 (Optional) - Get a Noctua OmniJoin Adapter Set
If you want to replace the fan of a Flex-ATX power supply and have chosen one of the two linked Noctua 40mm fans, then this step is not necessary for you. The OmniJoin Adapter Set is already included with these two fans. But, what is it exactly?

I quote Noctua itself here (translated from German).
“Since many devices in which 40mm fans are used have proprietary fan connectors, the NF-A4x10 comes with Noctua’s OmniJoin adapter set. Simply cut off the cable of the original fan, attach it with the included 3M Scotchlok™ clamps to the adapter and you can operate the NF-A4x10 on proprietary connectors!”
So this is a set consisting of
OmniJoin Adapter, a cable with PWM on one side and red 12V-, as well as black Ground-cable on the other side
4 pieces of 3M Scotchlok / Corning Presslok* (in the US) connectors
If you don’t want to cut off the fan cable, e.g. because you want to use the fan for something else in the future, then it makes sense to use the adapter from the first point. Personally, I cut off the cable of the original fan and then attached the 3M Scotchlok / Corning Presslok connectors directly to this cable.
Unfortunately, Noctua does not sell the complete adapter set with OmniJoin and Corning Presslok separately. However, I have found it at some eBay sellers, but at rather unreasonable prices around $15.
Alternatively you could get a direct adapter from 4-pin PWM to Micro 2-pin JST PH 2.0 like this one*. It has been recommended to me by u/IncompleteMantis on reddit.
Step 4 - Prepare your workspace

You will need:
The power supply
The new fan
A Phillips head screwdriver
(Optional) a pair of pliers
A side cutter*
2 pcs. 3M Scotchlok / Corning Presslok* (US)
Step 5 - Remove the standard fan
Start by loosening the 4 screws with which the power supply is sealed. Opening some power supplies can lead to the loss of the manufacturer’s warranty. In my case, there was no sticker on the screws. FSP may know itself that the factory-mounted fan is pretty rubbish.
Once you have loosened the four outer screws, carefully remove the cover plate in which the fan is also located. Now disconnect the fan cable including the plug from the power supply board. Make sure to really touch nothing but the cable or plug of the fan and only handle the power supply by its casing.

Step 6 - Install the new fan
Now remove the four screws that hold the fan in the power supply’s cover plate and install the new fan in the same place. Make sure that the back of the fan points into the power supply after assembly. This ensures that fresh air is blown onto the components of the power supply for cooling. This is roughly what the fully assembled fan should look like.

Don’t pay too much attention to the wiring in the above picture. I’ll explain that in the next step. The important thing for now is the mounting direction of the fan.
Step 7: Wiring the new fan with Corning Presslok
Now it gets a bit fiddly. First, cut off the connector of the old fan. Ideally, so that you still have a few centimeters of the two connection cables from the plug available. Then, if you don’t want to use an OmniJoin adapter (see above) like me, do the same with the new fan. If you want to use an OmniJoin adapter, simply plug the new fan into it.
Noctua itself describes very well in their documentation how the pin assignment looks like in their fans.

We are interested in the lower assignment for the NF-A9x14, as it is a 12V 4-Pin PWM fan. So now we know that the black cable is expectedly the ground cable (GND) and the yellow cable is the 12V connection.
Now all we have to do is connect these cables accordingly with their counterparts on the power supply fan plug. To do this, we plug the yellow Noctua 12V cable and the red 12V cable of the plug into the same Presslok adapter and press it firmly. It is important here that the cables are fully inserted into the adapter. Noctua also provides a graphic for this.
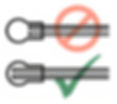
When the cables are in position, press the Presslok adapter firmly to connect the cables. You can use a pair of pliers, I simply placed the adapter on the table and used the shaft of my screwdriver to close the Presslok adapters.
Now simply insert the two remaining cables of the Noctua fan into the sleeve of the cable and secure everything with a cable tie.
The finished connection should look like in picture 2.


Step 8 - Reinstall the fan into the power supply
Now that the hardest part is done, we can reattach the fan, including the cover plate, to the power supply. For this, plug the 2-pin connector back into the receptacle of the power supply. Make sure to plug it in the right way round.
Also, when assembling, make sure that the cables do not protrude into the fan blades, so that the new fan can rotate freely.
Step 9 - Test the function of the fan
Once you have reassembled the power supply, blow once on the fan to check if it can rotate freely. If this is the case, loosely cable the power supply in your PC. Don’t screw anything tight yet, just connect all the cables first.
Then turn on the PC and see if the fan initially rotates once. If it does, you can fully reassemble everything. In my case, the power supply is factory-configured so that the fan only works under load. So we may need to put some load on the power supply. To do this, start some benchmarks like Cinebench and Furmark. After a few minutes, see if the fan starts to rotate under this load. If it doesn’t and the power supply is very warm to the touch, end the test and check if the wiring is correct. Does the fan rotate under load? Perfect!
Step 10 - Done! No more noisy PSU fan!
The fan rotates under load and everything works as desired? Great! Turn off the PC again and fully reassemble it. You’ve done it and replaced the loud stock fan of your power supply with a quieter, perhaps even inaudible option. In my case, the fan is still audible under load, but the sound profile of the Noctua is much more pleasant and doesn’t bother me personally, unlike the standard fan from FSP.


Did you like this article?
Were the tips helpful and easy to understand?
Would you dare to swap your power supply fan?
Feel free to leave me a comment!
*The links marked with * (asterisk) are so-called affiliate links. If you make a purchase through one of these links, I receive a small commission. The price for you does not change as a result. Thank you! :)